Safely learn how to strip anodized aluminum. Explore effective chemical & mechanical methods for precision parts, ensuring tolerances & finish in 2026.
You've got a finished aluminum part on the bench, and the anodize is now the problem instead of the protection. Maybe the color is wrong on a prototype run. Maybe a late design revision moved a sealing surface onto a previously cosmetic face. Maybe a hard-anodized part came back from finishing and now a press fit, thread, or mating feature needs to be reworked.
That's when stripping stops being a hobby-shop trick and becomes a process decision. On a CNC machined part, the question isn't only how to strip anodized aluminum. It's whether you can remove the coating without sacrificing the geometry you already paid to machine.
Most quick guides treat anodize removal like paint removal. That's the wrong mindset. Anodize is part of the aluminum surface, and the stripping method you choose affects finish, dimensions, edge definition, and any chance of successful re-anodizing later.
Table of Contents
- Cosmetic salvage is the easy case
- Functional salvage is where tolerance matters
- What designers usually underestimate
- Comparison of Aluminum Stripping Methods
- Set up the job around the print
- Run the strip by surface response
- Rinse immediately and verify the part condition
- Why precision parts are poor candidates
- Check for what is still there
When and Why to Strip Anodized Aluminum Parts
A common scenario looks like this. A design team approves a CNC prototype, sends it for anodize, and then learns that the color sample didn't match the intended product finish. The part is expensive, lead time is tight, and remaking it would push the schedule. Stripping becomes the salvage path.
That salvage decision makes sense in several situations. Cosmetic correction is the obvious one. Functional modification is another. A part may need a machined touch-up after finishing, or an anodized surface may now interfere with electrical contact, bonding, sealing, or assembly. In low-volume development, it's also common to strip parts that were finished to the wrong spec.

For prototype and bridge-production teams working with CNC machining services in this region, this comes up more often than people admit. Fast iteration means drawings evolve. Surface finish notes change. A part that was “done” last week can become a candidate for rework today.
Cosmetic salvage is the easy case
If the part is mostly cosmetic and dimensions are forgiving, stripping can be a reasonable way to recover value. You remove the anodize, clean the surface, and decide whether to re-anodize, paint, bead blast, or leave it bare for short-term evaluation.
The risk starts when people assume cosmetic stripping stays cosmetic. It doesn't. The moment the oxide is gone, the base metal is exposed to whatever process you're using next.
Functional salvage is where tolerance matters
Precision parts change the whole calculation. Threads, counterbores, bearing fits, datum faces, and sliding interfaces all care about what the stripping step does to the aluminum underneath. On a tightly machined component, success isn't “the color came off.” Success is “the coating came off and the part still does its job.”
**Practical rule:** Strip only when the value of saving the part is higher than the risk of altering its critical features.
That means asking a few questions before starting:
- What must remain dimensionally stable: Press fits, sealing faces, precision bores, and alignment features should drive the method choice.
- Is the part being refinished or only repaired: Re-anodizing has a different surface requirement than paint prep or local modification.
- Can you isolate noncritical areas: If only one region needs treatment, full immersion may be the wrong answer.
- Will the stripped finish be acceptable: Some parts survive chemically but lose the cosmetic uniformity they had before.
The right mindset is simple. Stripping is not a reset button. It's a controlled rework step with real consequences.
Choosing Your Stripping Method Chemical vs Mechanical
If the team is deciding between chemical stripping and blasting, don't frame them as interchangeable. They solve different problems and damage parts in different ways.
Chemical stripping is the usual choice when you need complete removal over complex geometry. It reaches corners, threads, pockets, and internal features more uniformly than abrasive methods. For thicker hard-anodized coatings, solvent-based paint strippers are generally ineffective because anodize isn't an organic paint film. Field guidance points instead to strongly alkaline sodium-hydroxide-based cleaners as the reliable route, with the key risk being over-etching once the oxide is gone, especially on tight-tolerance parts, as shown in this practitioner guide to removing anodizing from aluminum.
Mechanical stripping, usually blasting or localized abrasion, is better viewed as a subtractive surface process. It can be useful, but it doesn't politely stop at the anodize layer. On machined parts, it also rounds edges, alters texture, and makes localized damage easy to create and hard to reverse.
What designers usually underestimate
Design teams often focus on whether the coating will come off. Manufacturing teams focus on what the part looks like after the coating comes off.
Chemical removal tends to preserve access to intricate geometry better than blasting. A ribbed housing, pocketed bracket, or part with multiple tapped holes is hard to treat evenly with abrasives. Chemical immersion reaches all of it. The trade-off is that once the reaction breaks through the anodize, the same chemistry starts attacking the aluminum.
Blasting does the opposite. It gives the operator more local control, but that control is imperfect. A small pause on an edge, a slight change in angle, or aggressive media choice can change surface condition quickly.
Comparison of Aluminum Stripping Methods
| Attribute | Chemical Stripping (Alkaline) | Mechanical Stripping (Blasting) |
|---|---|---|
| Best use case | Full removal across complex geometry | Localized removal or cosmetic texturing |
| Coverage | Reaches recesses, threads, pockets, and internal features | Line-of-sight process, harder in deep features |
| Tolerance risk | High if exposure continues after oxide removal | High from direct base-metal removal |
| Surface finish outcome | Can leave dulling or etched appearance if overrun | Produces a blasted texture, not original machined finish |
| Suitability for hard anodize | Generally the reliable method | Possible, but often slow and increasingly destructive |
| Operator dependency | Monitoring and timing are critical | Technique and media selection are critical |
| Masking potential | Possible with chemical-resistant masking, but not foolproof | Possible, but edge creep and feathering remain issues |
| Best fit for precision CNC parts | Only with tight process control | Usually limited to noncritical areas |
If the print has critical fits or datums, choose the method by what damage you can tolerate, not by what equipment is nearby.
How I choose between them
I use chemical stripping when the job requires complete removal and the geometry is too complex to abrade consistently. That includes parts with internal corners, threaded holes, fine ribs, and hidden surfaces that must all be stripped before refinishing.
I consider blasting when the goal is different from restoration. Examples include preparing a noncritical exterior for a new coating, removing finish from a weld area, or creating a deliberately uniform matte texture where the original machined surface no longer matters.
A useful decision filter is this:
- Choose chemical stripping if uniform removal matters more than preserving the original cosmetic finish.
- Choose blasting if local access matters more than dimensional fidelity.
- Choose neither if the part has critical geometry and the only acceptable outcome is “as machined.” In that case, remake may be the cheaper choice in the long run.
That last option isn't popular, but it's often the honest one.
The Chemical Stripping Process for Precision Parts
A precision CNC part can survive stripping and still fail inspection. I have seen parts come out visually clean, then miss on thread fit, lose edge definition, or pick up enough etch on a sealing face to create a leak path. Chemical stripping works for precision parts only when the process is controlled around geometry, not just around coating removal.
Start before the bath. Remove coolant, oil, fingerprints, adhesive residue, and any shop dirt that can block the chemistry or create uneven attack. Patchy stripping pushes operators to leave the part in longer, and extra time is where dimensional loss starts.

Set up the job around the print
Treat stripping as a controlled manufacturing step. Review the drawing first. Identify datums, close-tolerance bores, threads, sealing faces, bearing seats, and any cosmetic surfaces that still matter after refinishing. If the team has not already defined what dimensional change is acceptable, do that before the part goes into solution. This guide to CNC machining tolerances is a useful reference for framing that discussion.
Use strong ventilation, chemical-resistant gloves, eye protection, protective clothing, and a non-metal container. Sodium hydroxide attacks aluminum aggressively and will keep attacking the base metal after the anodize is gone. Set the rinse station before immersion. Have water ready, tools ready, and an inspection light ready.
A few setup habits prevent avoidable scrap:
- Use dedicated plastic tools for handling and support.
- Record the starting condition with photos or notes on finish, color, and all critical surfaces.
- Mask only when the masking system has been proven for the chemical and exposure time you plan to use.
- Keep one operator responsible for timing and checks so the part is not left reacting while attention shifts.
Run the strip by surface response
Do not run this step by a fixed timer. Anodize thickness varies. Hard anodize and decorative anodize do not strip at the same rate, and neither do parts with mixed surface condition from machining, handling, or prior rework.
As noted earlier, field and shop guidance both point to the same operating rule. Bubbling and color change show that the reaction is active, but they do not tell you the part is safe to leave unattended. Once the oxide layer is removed, the chemistry starts etching the aluminum itself. On a loose-tolerance bracket, that may only affect appearance. On a precision machined part, it can change edge break, thread feel, bore size, or flatness enough to matter.
Check the part in short intervals. Lift it, rinse a small area, and inspect under good light. Look for a uniform change across exposed surfaces, especially in pocket floors, internal corners, and around thread starts where anodize can hang on longer.
The practical signs are straightforward:
- The reaction starts.
Light bubbling shows the chemistry is active.
- Surface color and sheen shift.
The target is a consistent stripped appearance, not the brightest possible metal.
- Continued bubbling after the coating is gone is a stop signal.
At that point, the bath is etching substrate, not removing finish.
If a part has critical fits, I prefer more inspections and shorter exposure windows over one long soak. That costs a few extra minutes and usually saves parts.
Later in the process, if you want a quick visual reference for handling and sequencing, this walkthrough is helpful:
Remove the part as soon as it is stripped enough for the next operation. Extra time in the bath does not improve the result.
Rinse immediately and verify the part condition
The rinse is part of the stripping process, not cleanup after it. Get the part into a thorough water rinse as soon as it leaves the bath so the alkaline attack stops before it changes the substrate further.
Then inspect the features that usually show damage first:
- Threads and blind holes because chemistry and residue collect there.
- Sharp edges because over-etch shows up there early.
- Flat sealing faces because surface attack can affect function before it is obvious visually.
- Corners and pocket floors because they often strip unevenly.
If residue remains, use the lightest manual correction the print allows. A Scotch-Brite pad can remove leftover film, but it also changes surface texture and can round edges on fine features. On cosmetic faces that may be acceptable. On datum surfaces or precision fits, it usually is not.
The correct endpoint is simple. The anodize is removed, the base material is still within acceptable condition, and the part is ready for dimensional inspection and the next finish.
Mechanical Stripping Techniques and Considerations
Mechanical stripping can work, but on CNC parts it's usually a compromise, not a clean solution. The moment you use abrasive force to remove anodize, you're making a surface-finish decision and a tolerance decision at the same time.
The most common method is blasting. In practice, that means choosing a media, setting stand-off distance and angle, and trying to remove the coating evenly without chewing into the substrate. That sounds controllable on paper. It's much harder on actual hardware.
Where blasting makes sense
Blasting earns its place in targeted jobs. If a part only needs local anodize removal for a weld prep zone, a coating bond area, or a noncritical cosmetic reset, it can be faster than setting up a chemical bath.

It's also useful when the final specification already accepts a blasted texture. If the next finish is a thick applied coating and the original machined appearance no longer matters, blasting may fit the process better than immersion.
Good candidates usually share a few traits:
- Noncritical dimensions: Exterior skins, covers, and brackets with generous tolerance.
- Accessible geometry: Open faces are far easier than internal pockets or deep channels.
- A finish change by design: If the part will end up matte or coated, you're not trying to preserve the original look.
Why precision parts are poor candidates
Blasting is line-of-sight and operator-sensitive. It rounds edges, changes reflectivity, and can erase the visual distinction between machined flats and previously finished faces. If a part has close fits, datum surfaces, or alignment features, blasting can compromise them before the operator realizes it.
That's why teams dealing with CNC machining tolerances should treat mechanical stripping as a last resort for critical parts. It's much easier to remove material than to prove afterward that you only removed the coating.
Manual abrasion has the same problem in a slower form. Sandpaper, abrasive pads, and localized hand work can fix a small defect or remove anodize from one accessible patch, but uniformity is hard to maintain. Flatness suffers. Edge breaks widen. Tool marks appear.
Use mechanical stripping when you can accept a changed surface. Don't use it when you need the part to look and measure like it did before anodizing.
If a team still chooses blasting, control the process tightly:
- Start with the least aggressive media: Don't begin with a cutting approach unless the job requires it.
- Run a sacrificial sample first: One test coupon will tell you more than a theory discussion.
- Protect critical areas: Masking helps, but it won't make a precision face immune to operator drift.
- Inspect continuously: Don't wait until the whole part is done to check edge definition and texture.
Blasting can solve a real production problem. It just shouldn't be mistaken for a gentle process.
Post-Stripping Inspection and Surface Preparation
When the anodize is gone, the most important work starts. A stripped part that hasn't been inspected is still an unknown.
Begin with a visual examination under strong, angled light. Residual anodize often remains in corners, pocket bottoms, threads, and deep bores. These remnants matter because they can interfere with any re-finishing step and make the final appearance inconsistent.
Check for what is still there
Look for three things at once. First, confirm the coating is fully removed where it needs to be removed. Second, identify any over-etched regions, especially on edges and flat functional surfaces. Third, check whether the stripping process created a nonuniform texture that will telegraph through the next finish.
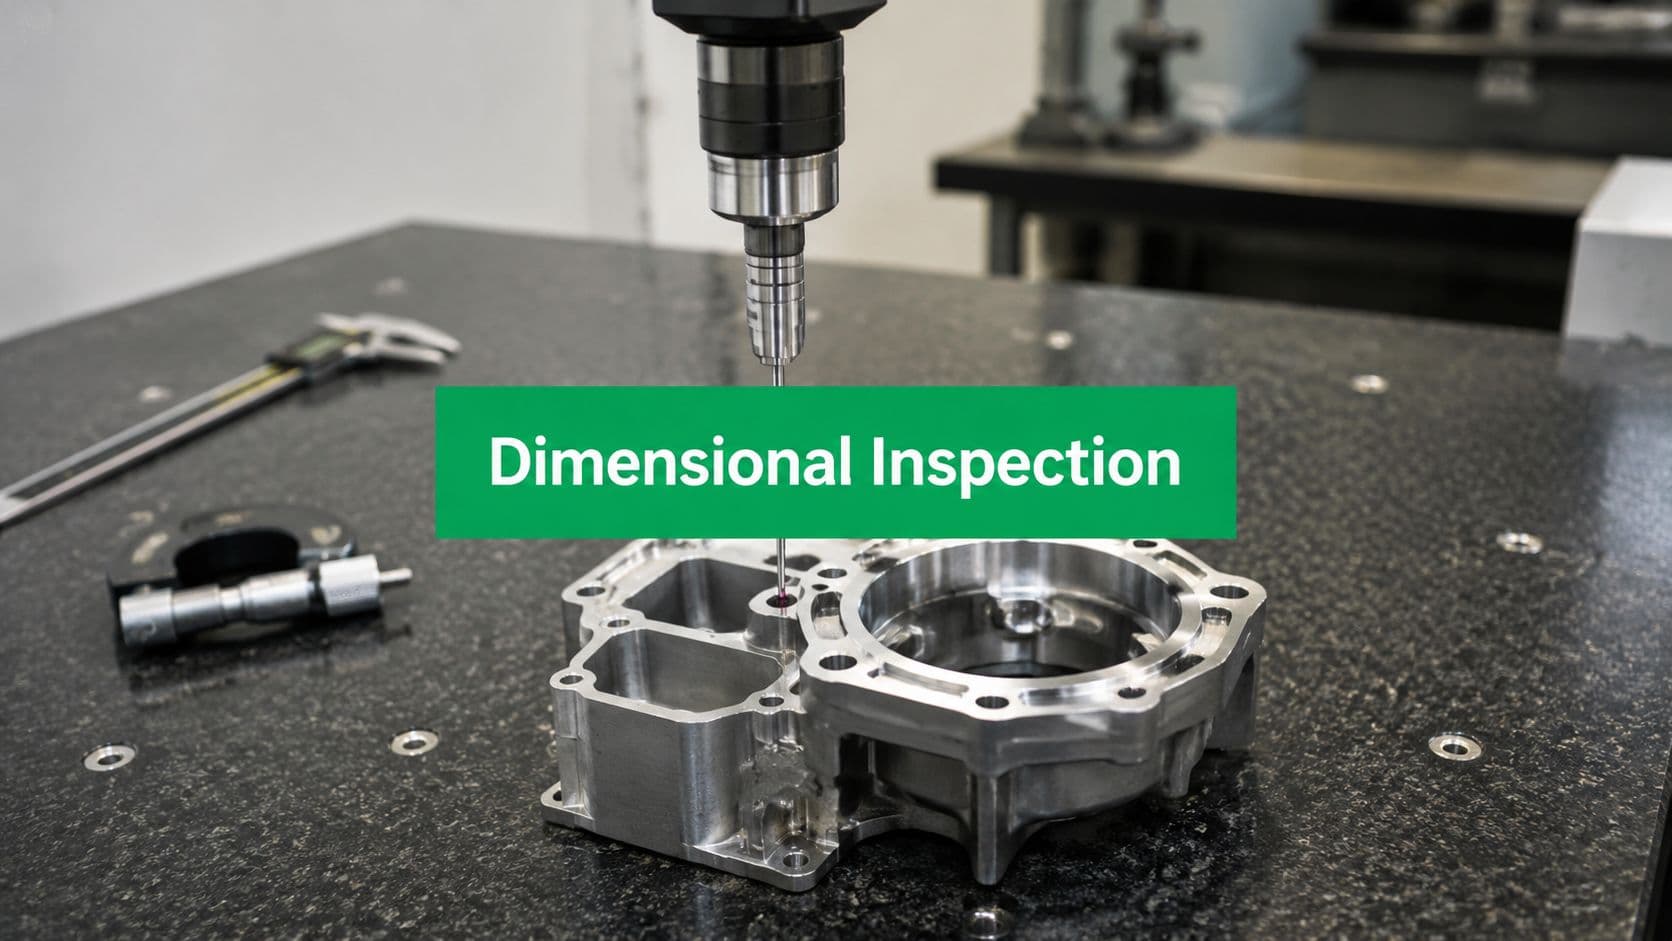
For critical-to-function parts, verify dimensions after stripping. Use calipers for straightforward external checks, thread gages where applicable, and a higher-level inspection method for features that drive assembly or sealing performance. Teams often find out whether the salvage decision saved time during this process.
A good inspection sequence is:
- Visual check first: Focus on corners, undercuts, threads, and recesses.
- Functional surfaces next: Measure bores, fits, datums, and sealing faces.
- Finish assessment last: Decide whether the current surface supports re-anodize, paint, blasting, or cosmetic brushing.
Prepare for the next finish
Stripped aluminum often needs cleanup before it's ready for the next operation. Smut, discoloration, or residue can remain even after the oxide is gone. If the next step is re-anodizing, the surface needs to be uniformly clean and free from leftover chemistry or residual coating. If the next step is paint or another applied coating, the surface profile and cleanliness need to match that finish system.
The most important handoff question is not “Is it stripped?” It's “Is it ready?” Those are different standards.
For teams planning the next operation, it helps to review available surface finishing options for machined parts before committing to a salvage path. A stripped surface that is unsuitable for re-anodizing may still be perfectly acceptable for another finish, provided the geometry remains within requirement.
A part can be chemically clean and still be manufacturing-unclean for the next process.
Handle the part with gloves after final cleaning. Bare aluminum picks up contamination fast, and once you've gone through stripping and inspection, it makes no sense to lose control at the last step.
Waste Disposal, Safety Protocols, and Troubleshooting
Sodium-hydroxide stripping is not a casual bench-top task. It requires PPE, ventilation, chemical-resistant containers, and a disposal plan before the first part goes into solution. Shops that treat disposal as an afterthought usually also treat process control loosely. Those habits travel together.
Spent alkaline solution and rinse water have to be handled according to local regulations. Neutralization and disposal procedures vary by jurisdiction and by what contaminants the bath has picked up from the stripped parts. The correct move is to follow your site's environmental process or consult the local waste authority before disposal. This is not optional.
A few failure modes show up repeatedly:
- Patchy stripping: Usually caused by oil, coolant residue, fingerprints, or inconsistent exposure.
- Excessive dulling: The part stayed in the bath after the oxide was gone.
- White residue after drying: Usually points to incomplete rinsing or contaminated rinse water.
- Dark smut or stubborn residue: The coating may be gone, but the surface still needs careful post-strip cleaning.
If the part is high-value and tightly toleranced, run a test piece first. If you don't have a test piece, question whether stripping is the right rework path at all. Precision manufacturing depends on controlled decisions, not optimistic ones.