Choose the right finish for your CNC parts. Get expert advice on powder coating vs anodizing from a professional CNC machining service.
You've got the machined aluminum part in hand. The geometry is right, the critical faces are clean, and the tolerance stack finally works. Then the finishing question lands on your desk: powder coat or anodize?
That decision changes more than appearance. It affects edge condition, fit on mating features, electrical behavior, scratch resistance, rework options, inspection method, and how smoothly your supplier can move the part from prototype into production. If you're buying through a cnc maching service in this region, the choice also affects how fast your vendor can finish, inspect, and ship without adding avoidable process risk.
the region is built for this kind of work at industrial scale. One industry overview says the country has more than 120,000 CNC machining centers producing over 140 million parts each year, with dense manufacturing clusters in places such as Shenzhen and Dongguan that support supplier networks and mature quality systems according to this industry overview of CNC machining factories in this region. That matters because finishing quality rarely depends on one shop operation alone. It depends on the surrounding ecosystem: pretreatment, masking, racking, inspection, packaging, and fast rework when something goes sideways.
The question isn't which finish is better in general. It's which finish is better for your part, your tolerance scheme, and your sourcing path.
Table of Contents
- Powder Coating vs. Anodizing At-a-Glance
- Corrosion and wear resistance
- Finish thickness and dimensional tolerances
- Color and appearance options
- Electrical and thermal properties
- Why integrated sourcing changes lead time
- Design rules that help powder coating
- Design rules that help anodizing
- For prototype rounds versus production release
- Can you powder coat over anodizing
- How much does machined surface roughness matter
- How should you specify anodized color
Choosing Your Finish After CNC Machining
A lot of teams treat finishing like the last cosmetic checkbox. That's usually a mistake. If the part has press fits, sealing lands, threaded holes, grounding points, or visible cosmetic faces, the finish needs to be part of the engineering decision from the start.
Powder coating and anodizing solve different problems. Powder coating adds a polymer layer on top of the metal. Anodizing converts the aluminum surface itself into a controlled oxide layer. One gives you cover. The other changes the surface.
That difference drives most of the trade-offs that matter in practice:
- Powder coating is often the easier way to get bold, uniform color and strong visual coverage on housings, brackets, and external parts.
- Anodizing is usually the cleaner choice when you care about dimensional control, metallic appearance, and preserving sharp detail on machined aluminum.
- Neither process is forgiving if the supplier ignores masking, pretreatment, or rack strategy.
**Practical rule:** If your drawing has critical fits and cosmetic faces on the same part, decide the finish before you release tolerances, not after RFQ.
The sourcing context matters too. A capable cnc maching service in this region can machine, review, finish, inspect, and package under one workflow, which reduces handoff errors. But you still need the supplier to think like a manufacturing engineer, not just a quoting desk. A nice color sample means very little if the vendor can't explain how they'll protect bores, verify thickness impact, or inspect after finishing.
The smart approach is simple. Pick the finish based on part function first, appearance second, and supplier control plan third. If those three don't agree, the finish choice isn't settled.
How Each Finishing Process Works
The mechanics matter because most field failures start with a basic mismatch between what the designer expects and what the process can do.

If you want a broader overview of related finishing options before narrowing the choice, this surface finishing guide for machined parts is a useful reference.
Powder coating
Powder coating is a deposited film process. The shop cleans the part, removes oils and oxides, and often adds a light blast or conversion pretreatment so the coating will stick properly. After prep, dry powder is sprayed with an electrostatic gun onto the grounded metal part.
The powder clings to the surface because of the charge difference. Then the part goes into an oven. Heat melts the powder, the particles flow together, and the coating cures into a continuous film.
What matters on the shop floor is that powder wants to build thickness. It wraps edges, bridges small features, and can crowd threads or close up tight clearance zones if masking is weak. It also depends heavily on line-of-sight application and rack orientation.
In plain terms, powder coating is good at covering the part. It's less good at respecting tiny geometric details unless the part was designed and masked for it.
Anodizing
Anodizing is an electrochemical conversion process used primarily on aluminum. The part is cleaned, fixtured, and submerged in an electrolyte bath. The aluminum part acts as the anode, and current drives formation of an oxide layer on the surface.
That oxide layer isn't paint. It becomes part of the aluminum surface. The layer is porous before sealing, which is why dyed anodized colors are possible. After optional coloring, the pores are sealed to improve corrosion resistance and stabilize the finish.
From an engineering standpoint, anodizing behaves very differently from powder. It preserves the metallic look of the underlying part, follows the machined texture much more closely, and generally fits parts with tighter dimensional requirements better than a film coating.
A machined surface still shows through anodizing. If the cutter marks bother you before finishing, they'll usually bother you after finishing too.
Anodizing also demands material discipline. Aluminum alloy selection, prior heat treatment, machining marks, and mixed surface conditions all influence the final look. That's why two parts from different lots can both be “black anodized” and still not look identical under the same light.
Technical Comparison Powder Coating vs Anodizing
A finish decision can save a build or create rework that should never have happened. I see this most often on the region programs where the machining quote looks fine, the finish note looks simple, and then the first batch shows coating in grounding areas, color shift between lots, or holes that no longer assemble cleanly. Powder coating and anodizing both work well, but they solve different problems.
Powder Coating vs. Anodizing At-a-Glance
| Attribute | Powder Coating | Anodizing (Type II & III) |
|---|---|---|
| Base process | Polymer film applied and cured on surface | Electrochemical oxide layer formed from aluminum surface |
| Best fit materials | Broad use on metals, especially visible housings and brackets | Primarily aluminum and aluminum alloys |
| Effect on dimensions | More likely to affect fit because it adds a surface film | Better for tighter tolerance parts when planned correctly |
| Edge coverage | Good visual coverage, but can chip on sharp edges | No paint film edge, follows substrate geometry |
| Wear behavior | Good impact and chip resistance in many general-use applications | Strong surface hardness, especially where abrasion matters |
| Appearance | Wide color and texture range, high cosmetic flexibility | Metallic, technical look with dyed or natural finish options |
| Electrical behavior | Acts as an insulative coating where unmasked | Oxide layer is electrically insulating unless contact areas are controlled |
| Typical use case | Cosmetic enclosures, guards, frames, external hardware | Precision aluminum parts, housings, plates, thermal parts, wear surfaces |
| Main sourcing risk | Poor masking, orange peel, edge build-up, weak adhesion | Color variation, alloy response differences, sealing inconsistency |
Material compatibility
Material narrows the choice fast.
Anodizing is for aluminum, and alloy choice matters more than many product teams expect. A 6061 enclosure, a 7075 bracket, and a cast aluminum cover will not react the same way in the tank, especially on black or other dyed finishes. If the product designer wants a uniform cosmetic surface across several aluminum part families, the shop should review alloy selection before release, not after the sample comes back with visible variation.
Powder coating is more flexible across metals. That matters when a the region supplier is machining aluminum parts, buying sheet metal brackets from another local vendor, and trying to match appearance across the final assembly. In that situation, powder often wins because it gives the sourcing team one visual target across mixed substrates.
Corrosion and wear resistance
These finishes fail differently in the field, so the use condition should drive the decision.
Powder coating protects as a barrier. It works well on covers, frames, and housings that see handling, occasional impact, and outdoor exposure if pretreatment is controlled. Once the film is damaged, the exposed area becomes the weak point, so edge prep and adhesion matter more than the catalog color.
Anodizing changes the metal surface itself. For aluminum wear plates, clamped fixtures, handheld devices, and parts that see repeated rubbing, it usually holds up better than a decorative polymer coating. Type III hardcoat sits in a different performance class than cosmetic Type II, so a supplier should confirm which one is being quoted instead of writing only “anodize” on the PO.
A simple rule works well here. Choose powder when impact resistance and broad cosmetic coverage matter more. Choose anodizing when surface hardness, scratch resistance, and dimensional control matter more.
Finish thickness and dimensional tolerances
Under specific circumstances, prototype builds often get expensive.
Powder coating adds film thickness, and that changes fits. Threaded holes, bearing seats, dowel bores, gasket lands, grounding pads, and sliding features all need a masking plan. If the the region supplier gives fast DFM feedback, this issue shows up before machining starts. If not, it shows up during assembly, after the parts have already crossed the ocean or entered final build.
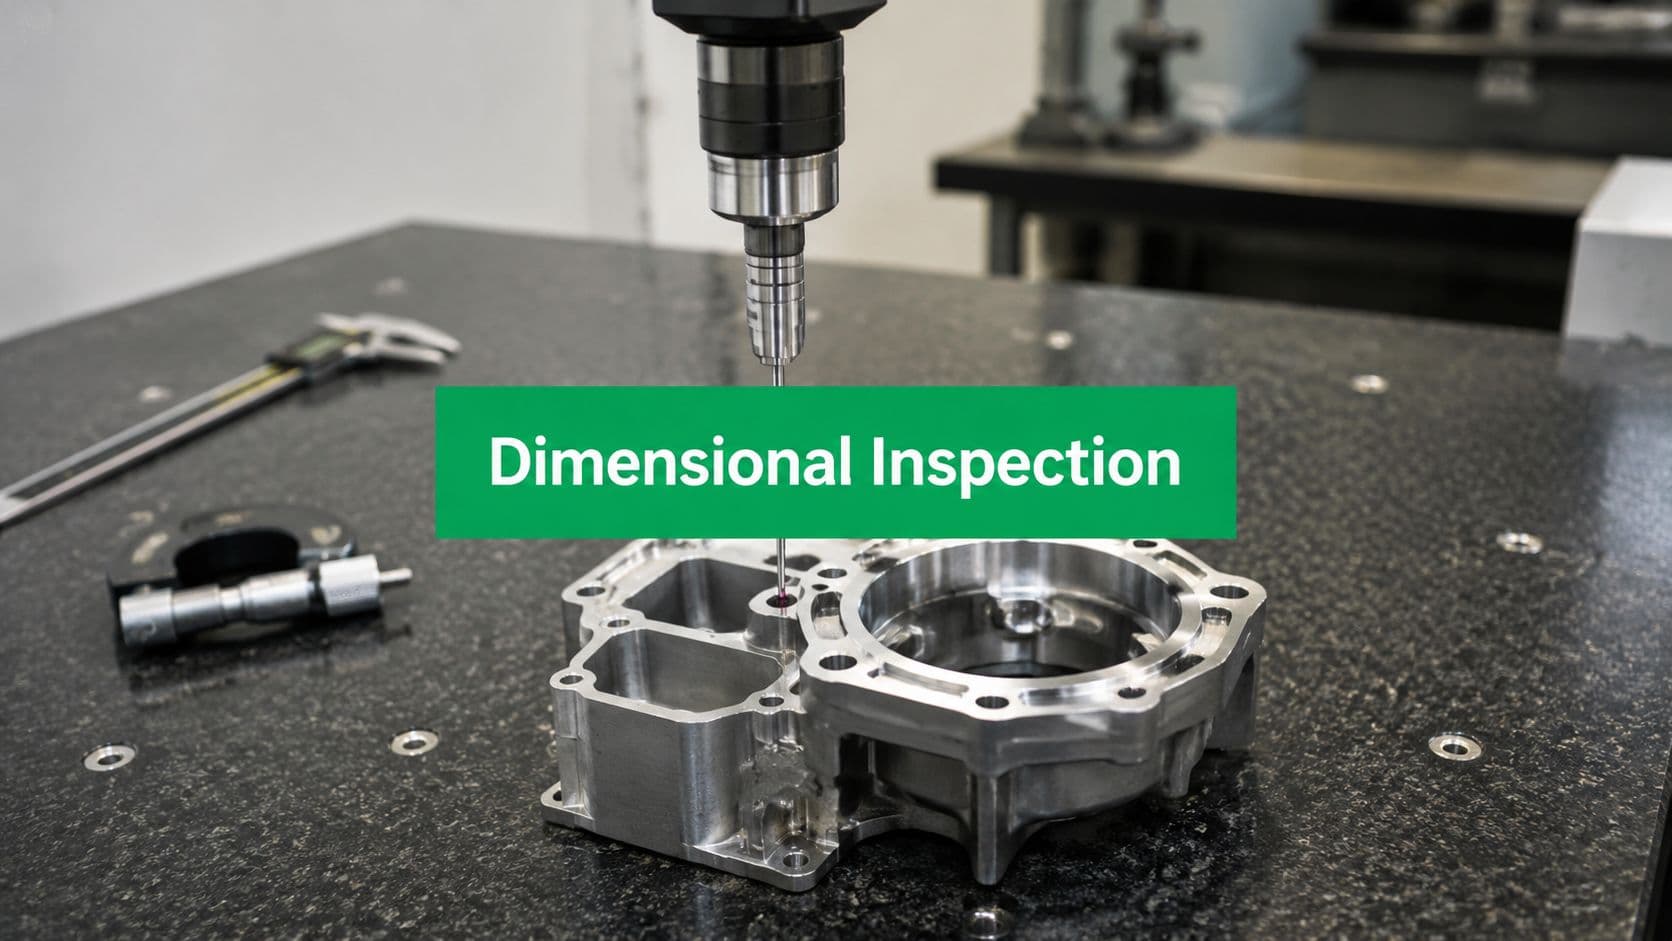
Anodizing is easier to manage on precision aluminum parts, but it still changes the surface and still needs planning around buildup and penetration. The drawing should call out critical dimensions as post-finish where required. Shops that handle this well do not just machine to print. They review tolerance stack, identify no-coat zones, and confirm how final inspection will be done after finishing.
If you are balancing finish choice against quote pressure, this matters as much as machining time. A good pricing review should include masking labor, inspection after finish, and likely rework risk, not just spindle time. This is covered well in a CNC machining cost and pricing guide.
If a bore, thread, or mounting face matters in assembly, the supplier should state whether it is inspected before finish, after finish, or both.
That one question is a useful filter when qualifying a rapid prototyping and production partner in this region.
Color and appearance options
Powder coating gives the designer more freedom. Color range is wider, texture control is better, and large visible surfaces are easier to make visually uniform. For consumer-facing housings or industrial equipment covers, that usually reduces cosmetic debate during approval.
Anodizing is less forgiving and often more premium looking on machined aluminum. It preserves the metal character, including tool marks, grain direction, and local surface differences. That can be exactly what a designer wants on a high-end aluminum part. It can also expose every inconsistency in the machining process.
For Chinese supply chains, the practical sourcing issue is repeatability. Powder suppliers need controlled cure and consistent spray technique. Anodizing suppliers need tight control of alloy mix, bath condition, racking, dye, and sealing. If color match matters, ask for lot-based sample retention and approval criteria in writing.
Electrical and thermal properties
Both finishes create insulating surfaces unless contact areas are intentionally left bare.
That matters for chassis bonding, antenna performance, test points, conductive threads, and thermal interfaces. Powder coating usually creates the bigger assembly risk because the film is thicker and easier to apply where it should not be. Anodizing can create the same problem on electrical contact surfaces, just in a different way.
For thermal parts, anodizing is often easier to integrate because it preserves geometry better and keeps the part looking like machined metal. For powder-coated enclosures, grounding studs, mating faces, and fastener seats should be identified early so the finishing vendor can mask them consistently. On the region programs with separate machining and finishing subcontractors, this needs to be documented on the drawing and in the outgoing inspection plan. Verbal instructions do not hold up well once volume starts.
Analyzing Cost Speed and Sourcing in this region
Finish choice is made in practical application, not in a lab. That means cost, lead time, and supplier coordination matter almost as much as the surface itself.
A useful benchmark from a 2026 outsourcing guide is that sourcing CNC machining from the region can save 30–50% versus Western suppliers, with the bigger shift being capability plus cost rather than labor cost alone in this the region CNC machining outsourcing guide. For finished parts, that advantage only holds if the machining shop and finishing workflow are coordinated well.
Here's a short video overview that fits this sourcing discussion:
What actually drives cost
Powder coating often looks cheaper at first glance because the quoting is straightforward and the visual result is easy to understand. For brackets, covers, and non-critical housings, it can be a very practical finish.
But actual cost depends on the part, not the name of the finish. These are the cost drivers that usually matter most:
- Masking complexity: More keep-out zones mean more labor and more risk.
- Cosmetic standard: A “good industrial finish” and a “consumer-facing cosmetic A-side” are not priced the same.
- Rework sensitivity: If a part can't be touched up without affecting fit or appearance, scrap risk rises.
- Batch mix: Small mixed-color lots tend to disrupt flow more than repeat production.
Anodizing can be efficient for aluminum programs that scale because the process aligns well with machined precision parts. But it becomes expensive when the alloy choice is unstable, the color expectation is too strict, or the shop has to sort too many cosmetic variables after the fact.
For buyers trying to estimate full-part cost, this CNC machining cost guide is useful because it helps separate machining cost from secondary process cost instead of blending them into one opaque quote.
Why integrated sourcing changes lead time
Lead time in finishing usually gets lost in handoffs. The machine shop waits for a local coater. The coater batches similar colors. Parts sit in transit. One failed face sends the job back for strip, rework, or remake.
That's why integrated or tightly managed supply chains in this region can be valuable for both prototypes and bridge production. A vendor that handles machining, DFM review, finishing coordination, and final inspection under one workflow can remove several waiting points.
A practical sourcing screen for a cnc maching service in this region is to ask four questions before PO:
- Who owns the finish spec? The machine shop, an outside finisher, or both?
- Who inspects post-finish dimensions?
- What happens if cosmetic approval passes but fit fails?
- Will the supplier send photos, masking confirmation, and final inspection evidence before shipment?
If the answers are vague, the lead time on paper probably isn't the lead time you'll get.
DFM Guidelines for Finished CNC Parts
A lot of finish failures start at the CAD stage, then show up after machining, when changes are expensive and lead time is already committed. That is especially true when working with a rapid prototyping or production supplier in this region, where the best results come from getting finish-specific DFM feedback before the first tool touches material.
A shop that can machine, review the drawing, coordinate finishing, and verify the part after coating or anodizing gives you a practical advantage. Finish choice affects masking, rack points, cosmetic acceptance, and post-finish inspection. If those details are left until after machining, the supplier is forced into rework, process exceptions, or cosmetic compromises.

If your team is still defining fit and inspection rules, this guide to CNC machining tolerances is a useful companion to finishing DFM.
Design rules that help powder coating
Powder coating needs clearance, access, and honest expectations about film build. Designers often treat it like paint on a drawing and forget that it adds thickness, rounds sharp visual transitions, and can create trouble in tight features.
Use these habits:
- Break sharp edges: Small edge breaks improve coating adhesion and reduce corner chipping during handling and assembly.
- Call out no-coat areas clearly: Mark bores, threads, bearing fits, grounding pads, seal faces, and electrical contact zones on the drawing.
- Open up difficult geometry where possible: Deep pockets, narrow channels, and blind corners are harder to coat evenly and harder to inspect afterward.
- Plan rack contact from the start: Every powder-coated part needs a support point. Put that mark on a hidden or non-cosmetic face instead of leaving the decision to the finisher.
- Leave margin on mating features: If a face, slot, or hole is already tight in the machined condition, added coating thickness can push it out of usable tolerance.
One common sourcing problem in this region is sending a cosmetic enclosure for powder coat with no approved hanging location and no masked-feature callouts. The shop can still quote it fast, but the risk shows up later in inconsistent appearance, delayed approvals, or hand-rework that should never have been necessary.
Design rules that help anodizing
Anodizing follows the base metal much more closely than powder coating. That helps on precision aluminum parts, but it also means the machining quality underneath stays visible.
For anodized parts, use a different set of DFM priorities:
- Specify the surface before finish. Tool marks, chatter, witness lines, and uneven hand blending will still show after anodizing.
- Keep alloy selection consistent when color matters. Different aluminum grades can anodize to visibly different shades, even in the same batch.
- Define cosmetic zones on the drawing. A hidden mounting face does not need the same visual standard as an exposed customer-facing surface.
- Separate appearance requirements from fit-critical features. Tight tolerance features can usually be controlled. Perfect color uniformity can also be controlled. Demanding both everywhere increases cost and slows the job.
- Review masking and fixturing early: Threaded holes, conductive contact points, and datum features may need to stay bare, and that should be resolved during DFM, not after sample approval.
The practical lesson is simple. An anodized part with poor machining will still look like a poorly machined part, just with a more expensive finish.
The right supplier does not just copy the finish note from your drawing into a traveler. They question geometry that is hard to rack, call out masked areas that are missing, and confirm how post-finish dimensions will be checked.
That is where an integrated the region supplier can save time. The value is not only lower piece price. It is getting machining, finishing coordination, and inspection aligned early enough to avoid remakes. LC Proto, for example, states that each project starts with a DFM review and is followed by IPQC and final inspection using CMMs and laser scanning. That kind of workflow helps when powder coating or anodizing has to coexist with tight-tolerance features, because masking strategy and post-finish verification can be settled before production starts.
When to Choose Each Finish for Prototypes and Production
The right answer depends on what the part has to do after it leaves the box.
the region-based suppliers are increasingly optimized for rapid iteration. Some vendors advertise delivery of high-precision custom parts in as little as 24 hours or one day, but the more important lesson is that speed must be checked against metrology discipline and finish control as described in this CNC machining service overview. Fast prototypes are useful only if they still assemble and still represent the production intent.
Choose powder coating when
Powder coating is usually the better call for visible external parts where appearance coverage and general durability matter more than very tight feature control.
Good candidates include:
- Enclosures and covers: Especially when the part needs a uniform, branded appearance.
- Mounting brackets and guards: Where the coating provides visual consistency and practical protection.
- Insulated external surfaces: When you don't want incidental contact with bare conductive metal.
It's also a practical prototype finish when your team is testing color, texture, and user perception more than precision mating behavior.
Choose anodizing when
Anodizing is the stronger choice for aluminum parts where dimensional discipline, metallic appearance, or surface hardness drives the requirement.
Use it for parts like:
- Precision plates and housings: Where bores, datums, and machined detail still matter after finishing.
- Handles, knobs, and exposed aluminum hardware: When the metal look is part of the product language.
- Wear-prone aluminum surfaces: Especially where repeated contact would damage a softer cosmetic film.
If the part includes threads, O-ring lands, close-fit bosses, or alignment features, anodizing usually creates fewer downstream headaches than powder coating.
For prototype rounds versus production release
For prototypes, the finish should support the question you're asking.
If the question is cosmetic, powder often gets you there faster. If the question is assembly realism, anodizing often gives a more production-representative result for machined aluminum. Don't ask one finish to answer both questions unless the prototype is already near production intent.
For production, lock the process when these items are clear:
- The alloy is frozen
- The cosmetic acceptance standard is documented
- Critical masked areas are shown on the drawing
- Inspection after finishing is defined
If those aren't locked yet, your finish spec is still provisional, even if the PO says otherwise.
Common Failure Modes and How to Avoid Them
Most supplier pages talk about fast quotes and broad capability. Fewer explain how you verify that the finish process is controlled. That gap matters. One review of the region CNC service marketing notes that buyers still need evidence such as CMM reports, traceability, process control, and clear handling of nonconformance rather than relying on broad “vetted” claims in this discussion of CNC machining service quality verification in this region.

Powder coating failures
The common powder problems are visible and usually trace back to prep, geometry, or masking.
- Poor adhesion: Often comes from weak cleaning or bad pretreatment.
- Orange peel texture: Usually tied to application settings, cure behavior, or trying to force appearance over geometry.
- Chipping on edges: Sharp corners and thin edge support are frequent causes.
- Bridged threads or filled details: The coating was allowed into functional features that should've been masked.
The prevention is straightforward. Specify edge breaks, define no-coat zones clearly, and ask the supplier to show the masking plan before finishing.
Anodizing failures
Anodizing failures look different. The geometry usually survives, but the surface may not meet the expected visual or functional standard.
Watch for:
- Color inconsistency from alloy variation or uneven pretreatment.
- Visible machining marks that the team expected the finish to hide.
- Patchy cosmetic appearance from mixed surface conditions.
- Weak functional performance when sealing or process control is inconsistent.
Ask for evidence, not reassurance. A serious supplier should be able to show how they inspect finished parts, how they record nonconformance, and how they separate cosmetic defects from dimensional defects.
The fastest way to reduce finish risk is to qualify one representative part properly. Don't approve only a photo. Approve the actual combination of alloy, machining route, finish, masking, and inspection evidence.
Frequently Asked Finishing Questions
Can you powder coat over anodizing
You can, but it's usually not the first choice for a new design. Stacking finishes adds process complexity and creates more variables around adhesion, appearance, and rework. If a part needs that stack, qualify it with the exact substrate and prep route you'll use in production.
How much does machined surface roughness matter
A lot. Anodizing tends to reveal the underlying machined texture more clearly. Powder coating hides more, but it won't fix bad geometry, deep tool marks, or hand-blended surfaces that vary from part to part. If the cosmetic face matters, control the pre-finish machining path.
How should you specify anodized color
Use a written finish callout, define whether the surface is cosmetic or functional, and approve a real sample when color matters. Don't rely on a generic “black anodize” note if the product has visible exterior faces. You want agreement on alloy, appearance standard, and acceptance criteria before production starts.