A complete guide to sand blasting and powder coating for engineers. Learn the process, how blasting prepares parts, and how to avoid common finish defects.
You've got a finished part design, the geometry is locked, and the machining looks good on paper. Then the finishing questions start. Do you need blasting at all. What media should the shop use. Will powder coat hide small flaws or make them more obvious. And if the coating fails later, was the problem in the oven, at the spray gun, or back at surface prep?
That's where most finishing conversations go wrong. People treat sand blasting and powder coating as separate line items, when in practice they're one linked system. The blast profile, media, pressure, nozzle angle, cleanliness after blasting, and the alloy itself all affect whether the final coating bonds cleanly or fails early.
A durable finish doesn't come from adding a nice-looking top layer to raw metal. It comes from controlling the surface before the powder ever reaches the part. If you're sourcing prototypes or production parts and want fewer surprises, it helps to think about finishing the same way you think about machining tolerances. Surface prep is a controlled process, not a cosmetic afterthought. For teams evaluating upstream manufacturing as part of that process, it also helps to work from a supplier base that understands the full path from machining to finishing, not just one operation in isolation, such as a CNC machining service in this region.
Table of Contents
- How sand blasting changes the metal surface
- How powder coating forms the finish
- What the anchor profile actually does
- A practical decision matrix for prep
- Why blasting can hurt the finish
- Recommended Sand Blasting Parameters by Material
- QA checks before powder goes on
- Defects that start in surface prep
- What to inspect before curing
- What to ask a finishing supplier
- Prototype finish versus production finish
- Choosing a partner that can control the result
Introduction to Durable Surface Finishes
A durable metal finish has two jobs. It has to protect the part in service, and it has to look intentional when the customer sees it. That sounds simple, but the quality gap between a finish that lasts and a finish that flakes usually starts before coating, not during coating.
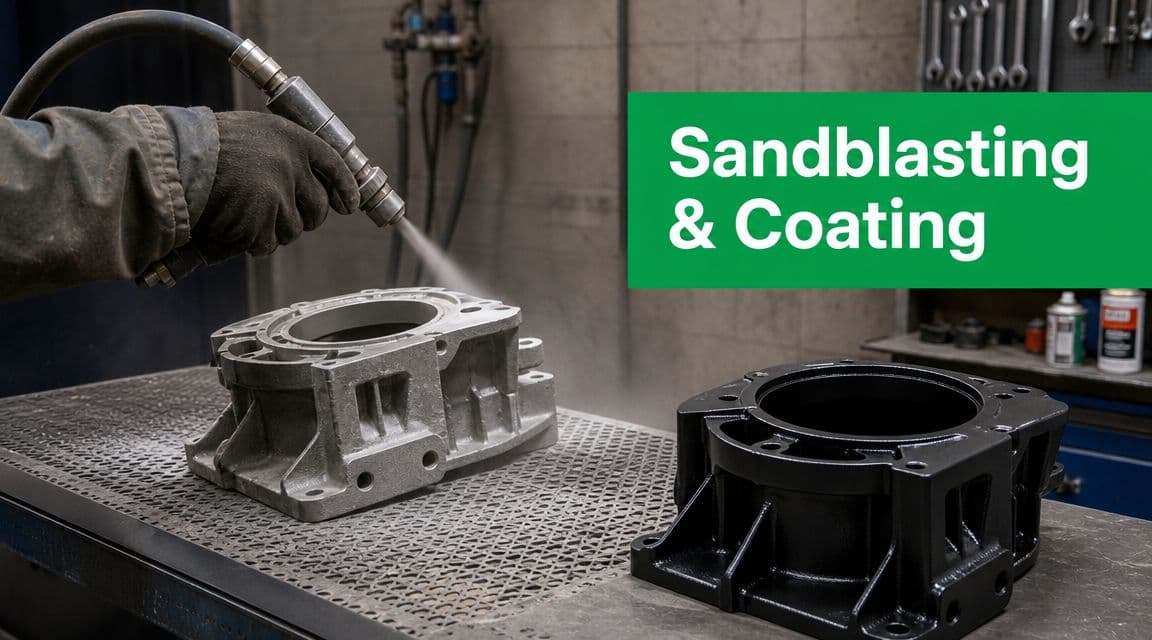
Sand blasting matters because it does more than strip off visible contamination. It resets the surface. It removes rust, mill scale, laser scale, welding splatter, and residue that would otherwise sit between the metal and the coating. Done well, it also leaves behind a controlled texture that gives the next layer something to grab.
Powder coating is the finish that benefits from that prep most clearly. Unlike liquid paint, it relies on a clean, properly profiled substrate if you want strong adhesion and a uniform cured film. If the base is inconsistent, the coating often tells on you. Corners may texture differently from flats. Recesses may hold contamination. Previously coated parts may hide residue that only shows up after cure.
**Practical rule:** Don't ask whether a part needs blasting. Ask what surface condition the coating system needs, then work backward to the prep method that creates it.
That shift in thinking changes the whole project. Instead of treating sand blasting and powder coating as two generic shop services, you start specifying them as a linked process with intent.
Core Concepts of Sand Blasting and Powder Coating
A part can leave machining looking excellent and still fail in finishing if the blast stage is wrong. I have seen clean-looking steel come out of the booth with powder that cured well, matched color, and still chipped early because the surface profile was uneven across flats, edges, and weld zones. That is the relationship to understand first. Blasting sets the surface condition that powder coating has to follow.
How sand blasting changes the metal surface
Sand blasting is controlled abrasion at production scale. Abrasive media strikes the part at speed, removes oxide, scale, and residue, and leaves behind a measurable surface texture. That texture affects how the coating wets the metal during cure, how well it keys into the surface, and how the final finish looks once gloss and film build make every inconsistency easier to see.
In production, blasting pressure and media selection change with the substrate and the defect risk. This overview of powder coating versus sandblasting process basics and market data notes typical blasting ranges of about 0.4 to 0.8 MPa (60 to 115 psi), with aluminum often run lower, around 40 to 60 PSI, to reduce the chance of surface damage. Those ranges are a starting point, not a universal setting. The same pressure that cleans steel efficiently can peen soft aluminum, round off edges, or drive abrasive into a porous casting.

For parts that have cosmetic faces, threaded areas, machined fits, or mixed geometries, process choice needs to sit inside the wider surface finishing requirements for manufactured parts, because the blast that helps adhesion on one area can damage another.
How powder coating forms the finish
Powder coating applies a dry, electrically charged material to a grounded part, then cures it into a continuous film. During heating, the powder melts, flows, and crosslinks or fuses, depending on chemistry. The final result depends on far more than color and cure temperature. Film build, edge coverage, part grounding, oven uniformity, and the surface left by blasting all show up in the cured finish.
A practical process summary from Powder Coating Institute guidance on how powder coating works explains the sequence clearly: electrostatic application, melt and flow in the oven, and formation of a durable finish without the solvent carrier used in liquid paint. That process is forgiving in some areas and unforgiving in others. Powder can cover minor color variation well, but it will also record blast streaks, embedded media, and roughness changes from one feature to the next.
Why the pairing works
Blasting and powder coating should be treated as one finishing system with two linked stages. The first stage creates cleanliness and profile. The second stage locks that condition under a cured film.
Poor blasting can lead to expensive defects. Excessive pressure can leave a profile that prints through the powder as a coarse texture. Dirty or worn media can embed contamination that later shows up as fisheyes, pinholes, or adhesion loss. Uneven nozzle angle or stand-off distance can produce visible shading after cure, especially on large flat panels or parts with mixed welds and machined faces.
Good results come from matching the blast profile to the coating system and the part geometry. Thin-gauge parts need restraint. Heavy weldments can tolerate more aggression. Aluminum, stainless, and carbon steel each respond differently. If the surface is overworked or contaminated during prep, powder coating will preserve that mistake over the full part.
How Sand Blasting Enables a Superior Powder Coat
The biggest misconception in metal finishing is that blasting is just a cleaning step. It isn't. For powder coating, blasting creates the condition that makes reliable adhesion possible across the whole part, including weld zones, edges, scale-covered areas, and fabricated surfaces that hand cleaning won't normalize.

Industry guidance from PAC Powder explains that abrasive blasting for powder coating is valuable because it removes rust, mill scale, welding spatter, and other contaminants while creating a mechanical anchor profile that helps the coating key into the surface. The same guidance says blasting reaches bare metal and profiles the full surface, which is why it is widely treated as the most reliable pretreatment for consistent powder adhesion on metal parts, as outlined in this article on sandblasting as a pretreatment for powder coating.
What the anchor profile actually does
Under magnification, a blasted surface isn't flat. It has peaks and valleys. When powder melts in cure, it flows over and into that topography. After it hardens, the coating has more than surface contact. It has mechanical interlock.
That interlock is why blasted parts generally outperform merely wiped, brushed, or chemically cleaned parts when the end goal is powder adhesion on metal. It's also why a part that looks visually clean can still be a poor candidate for coating. Visual cleanliness alone doesn't tell you whether the profile is appropriate.
A few practical consequences follow from that:
- Flat sheets and machined faces need enough profile to support adhesion, but not so much aggression that you deform thin sections or create an ugly texture telegraphed through the powder.
- Weldments often benefit from blasting because weld spatter and scale create local surface differences that powder will exaggerate if left in place.
- Reworked or previously coated parts need more judgment. Old coating residue and inconsistent substrate history can make adhesion unpredictable even after blasting.
A practical decision matrix for prep
The right blasting setup depends on substrate, geometry, and the performance requirement of the final coating. A simple decision matrix helps keep the conversation grounded.
| Part condition | Main prep goal | Blasting approach | Powder coating implication |
|---|---|---|---|
| New mild steel with scale or weld spatter | Remove contamination and create anchor profile | Use a media and pressure combination that cleans fully without gouging | Strong base for durable adhesion |
| Aluminum part with visible machining marks | Clean lightly and avoid surface damage | Lower pressure and gentler treatment | Reduces risk of telegraphing damage through finish |
| Thin sheet metal | Normalize surface without distortion | Conservative pressure, constant nozzle motion, careful angle control | Better cosmetic consistency after cure |
| Complex bracket with pockets and corners | Achieve even profile across mixed geometry | Adjust angle and access strategy to avoid overblasting exposed corners | Prevents uneven coating behavior |
| Previously coated part | Remove old residue and assess substrate history | Validate cleanliness after blasting, not just appearance | Lowers risk of adhesion failure from hidden contamination |
The main lesson is simple. Blasting has to be matched to the part, not just checked off the router.
A quick visual walkthrough helps if you want to see how blasting supports coating prep in practice.
Controlling Process Parameters for Key Materials
A finishing line can produce two parts from the same print, coated with the same powder, and only one will pass cosmetic review. The difference often starts in the blast cabinet. Small changes in media, pressure, nozzle angle, or how long the operator stays on an edge can change surface profile enough to show through after cure.
That relationship matters because powder coating does not mask preparation errors well. It follows the surface it lands on. If blasting smears contamination, rounds edges unevenly, embeds abrasive, or leaves a mixed profile across the part, the coating will lock those conditions in place.
Why blasting can hurt the finish
The failure mode depends on the material and the geometry. Aluminum is easy to overblast, especially on machined faces or thin sections. Corners and exposed edges pick up more energy than recessed features, so a part can leave the blast step looking uniformly dull while the underlying texture is far from uniform. After coating, those differences show up as gloss variation, texture shift, poor edge appearance, or inconsistent film build.
Steel creates a different set of trade-offs. Higher aggression may be needed to remove scale, rust, or weld residue, but too much profile can force the coating to bridge peaks instead of wetting the surface evenly during cure. On previously coated parts, the common problem is false confidence. The surface looks clean, but old coating residue, trapped dust, or abrasive hidden in seams can still cause defects later.
Powder coating itself is straightforward in principle. Dry powder is electrostatically applied to a grounded part and then cured into a continuous film. The process avoids liquid solvent and can produce a durable coating with good edge coverage, but it still depends on a clean, consistent substrate. As noted earlier, cure cannot correct a bad blast profile.
A good powder coat follows the surface it receives. It does not correct embedded grit, uneven roughness, or contamination pushed into the substrate during prep.
Recommended Sand Blasting Parameters by Material
Use these ranges as starting points for process setup, supplier discussions, and sample runs. Final settings still need shop trials on the part geometry being coated.
| Material | Recommended Media | Typical Pressure | Key Consideration |
|---|---|---|---|
| Aluminum | Gentler media such as glass beads | Roughly 40 to 60 PSI for common starting conditions on aluminum, based on earlier cited shop guidance | Limit substrate damage and avoid overtexturing machined or cosmetic faces |
| Mild steel | More aggressive media such as aluminum oxide or steel-oriented abrasive chosen for cleaning need | About 60 to 115 psi is a common industrial range in practical shop settings, as noted earlier | Remove contamination fully while keeping a uniform anchor profile across flats, edges, and weld areas |
| Stainless steel | Non-contaminating media selected to preserve surface quality | Start conservatively and validate profile on sample parts | Prevent surface conditions that hurt appearance, corrosion performance, or coating consistency |
Material choice affects the whole finishing window, not just the machining plan. For earlier design-stage decisions, this materials reference for manufacturing projects is a useful starting point.
QA checks before powder goes on
Good shops inspect between blasting and coating, not only after cure. That checkpoint should focus on conditions that blasting can create and powder will later reveal.
- Check for trapped abrasive: Inspect pockets, weld intersections, blind features, and seams where media can lodge and break free during coating.
- Compare high-exposure and low-exposure areas: Edges, corners, and outside radii often get a stronger blast than recessed zones. Large differences usually mean the surface profile is not consistent.
- Review texture under controlled lighting: Shop glare hides a lot. Inspection lighting makes streaks, residual coating, peening, and mixed roughness easier to spot.
- Verify cleanliness after blow-off or wash: Dust left from blasting often becomes nibs, fisheyes, or adhesion problems.
- Use sample panels or first-article parts for appearance-critical work: This is the fastest way to confirm that the chosen media, pressure, and coating system work together on the actual part.
Prototype work especially benefits from that last step. Teams will spend time tightening tolerances on machining, then accept finishing settings from a previous job that used a different alloy or geometry. That is where preventable rework starts.
Inspecting Quality and Managing Common Defects
The most useful troubleshooting habit in sand blasting and powder coating is to stop blaming the topcoat first. Many visible coating defects originate in surface preparation. The coating only reveals what the substrate and prep process set up.
Current industry discussion often misses that nuance. One of the more practical observations on the topic is that sandblasting can create powder-coating defects instead of preventing them, especially on complex geometries. Common failure modes include embedded abrasive, uneven roughness on corners versus recessed features, and adhesion problems when blasting is too aggressive or the wrong media is used. The more useful question is what blast profile and cleanliness level fit the alloy, geometry, and coating system, as explained in this discussion of sandblasting and powder coating process control.

Defects that start in surface prep
Some defects are easy to spot but hard to diagnose unless you trace them backward.
- Poor adhesion: If the coating chips too easily or lifts at edges, look for contamination, inadequate profile, or an inconsistent blast pattern.
- Fisheyes or crater-like disruptions: These often point to contamination left on or introduced into the surface before coating.
- Texture inconsistency across one part: Corners may come out rougher while recessed faces remain underprepared.
- Visible inclusions: Embedded abrasive or residual dust can show up after cure as surface defects.
Not every rough-looking finish is a powder problem. Sometimes the powder is merely recording the substrate too faithfully.
What to inspect before curing
A disciplined pre-cure inspection catches more than a post-cure cosmetic review because the root cause is still visible.
Start with the surface itself. Does it look uniformly prepared from flats to corners to deep features? If the part has internal pockets, louvers, tabs, or welded intersections, inspect those specifically. Those are the zones where inconsistent blasting or trapped media often survives.
Then review the part as a dimensional object, not just a finish candidate. Blasting removes material. Powder coating adds material. On loose-tolerance fabrications that may not matter much. On tight-tolerance parts, mating faces, threaded interfaces, sealing surfaces, and masked regions must be called out early so the finishing process doesn't compromise fit.
Surface prep should be inspected like machining. If a feature matters after finishing, identify it before finishing starts.
What to ask a finishing supplier
If you're choosing a shop, ask process questions that reveal whether they control outcomes or just perform operations.
- How do you adjust blasting for different alloys and thin sections?
A capable shop won't give one stock answer for steel, aluminum, and stainless.
- How do you handle complex geometries?
Recesses, corners, pockets, and weldments need a strategy, not just time in the cabinet or blast room.
- How do you verify cleanliness before coating?
Visual inspection alone is often not enough for parts with hidden features.
- What surfaces will you protect or mask?
Critical fits, threads, datum surfaces, and electrical contacts shouldn't be afterthoughts.
- Can you show sample panels or first-article finish approval?
That's one of the simplest ways to reduce disputes about appearance and adhesion.
A good supplier doesn't just say they blast and coat. They can explain how they prevent blasting from becoming the source of the defect.
Recommendations for Prototyping and Production
Prototype finishing and production finishing shouldn't be specified the same way by default. The required outcome is different, so the process discipline can also differ.

Prototype finish versus production finish
For an early functional prototype, you may only need corrosion protection, handling durability, and a clean visual read. In that case, the right question isn't whether the finish is perfect. It's whether the finish supports the test objective without wasting time or budget.
For customer-facing prototypes, demo units, and pilot builds, the bar rises fast. Surface defects that are acceptable on an internal test bracket become unacceptable on a housing, exposed frame, or branded product. Pre-production sample approval becomes essential. Validate blast media, surface appearance, gloss expectation, masking strategy, and coating behavior on the actual material before scaling.
Use a simple decision lens:
- Functional prototype: Prioritize speed, protection, and enough consistency to support testing.
- Investor or customer demo part: Prioritize appearance and repeatability, especially on visible surfaces.
- Bridge production or low-volume launch: Prioritize process control and documentation, because rework becomes expensive quickly.
Choosing a partner that can control the result
The best manufacturing partners think about finishing before the part reaches the coating line. They review geometry for trapped media risk, masking needs, surface accessibility, and tolerance stack-up after coating. They can machine the part accurately, then coordinate finishing so the final result still meets the drawing intent.
Look for practical capabilities, not marketing language:
- DFM review that includes finishing concerns: Edges, pockets, threads, and cosmetic faces should be discussed early.
- Integrated machining and finishing coordination: Fewer handoffs usually mean fewer interpretation errors.
- Inspection discipline after finishing: If dimensions matter post-coat, they should be verified post-coat.
- Support for prototype through low-volume production: The process should scale without being reinvented each time.
- Clear communication on trade-offs: A good partner will tell you when a requested cosmetic standard conflicts with geometry, alloy choice, or schedule.
If you treat sand blasting and powder coating as one controlled finishing system, you'll get better parts and fewer arguments about why a coating failed.